Introduction
ControlSync is an exclusive service designed for keyboard and mouse users, enabling the creation of an advanced virtual controller fully compatible with DualShock 4 (PlayStation) and Xbox 360.
This is a commercial, proprietary software developed by ControlSync Softwares, crafted with the highest standards of quality to deliver a complete and professional customization experience.
Within the application, users can:
- Fine-tune every parameter of the controller.
- Configure sensitivities according to personal preferences.
- Create and manage macros with ease.
- Fully customize the controller for optimal performance.
This product is licensed on a single-user, non-transferable basis. Each license is strictly bound to one user and one device. Sharing or installing the same license on multiple systems is not permitted.
In summary, ControlSync is not just software—it is a professional tool that grants total control over your keyboard and mouse experience, offering a level of precision and customization that makes it a truly exclusive solution in the market.
Installation
To ensure a smooth setup of ControlSync, please follow the installation steps carefully before reaching out to support. Many common questions are already documented here.
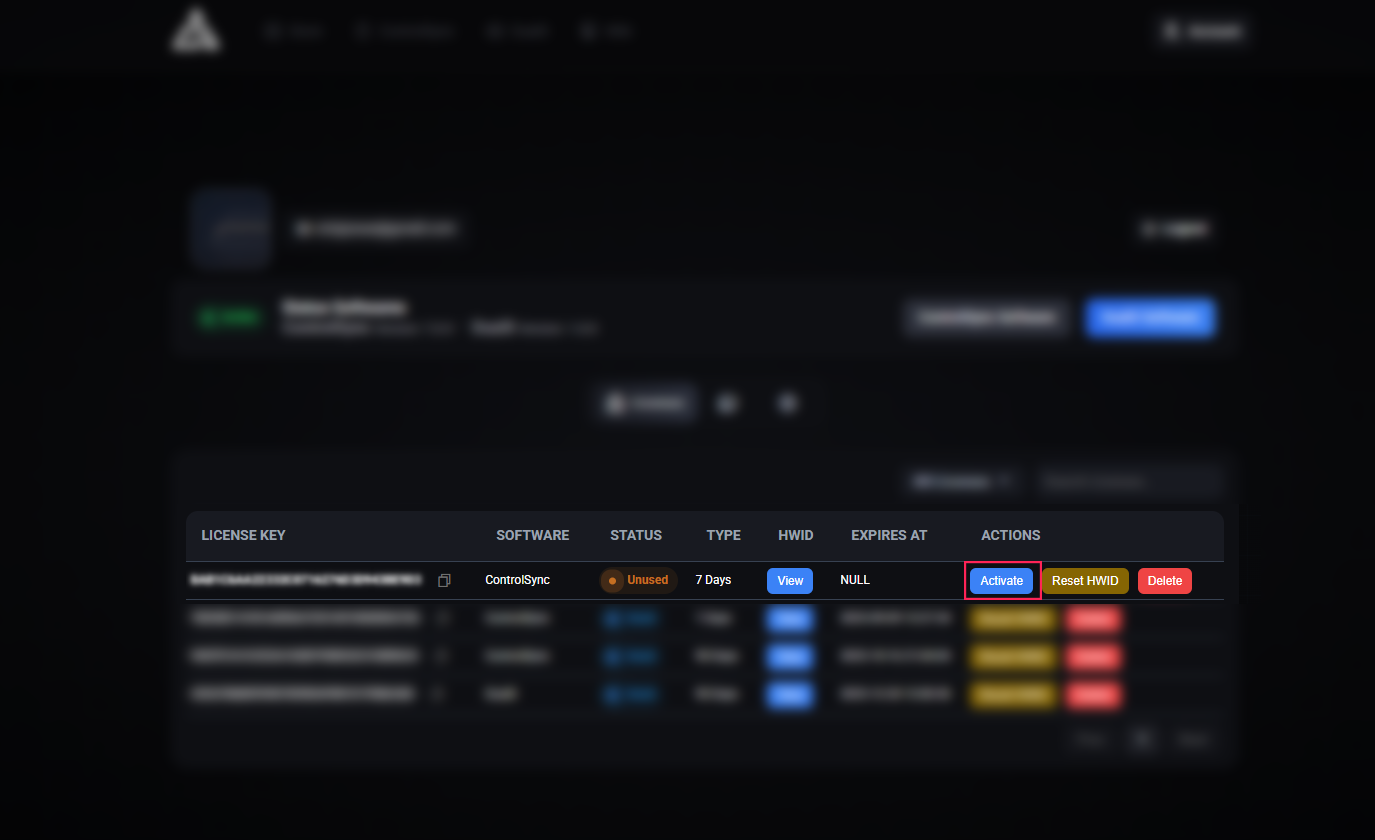
1. License Activation
Before downloading ControlSync, you must first log into your account and activate your license.
Why is activation required?
When you purchase a license, it immediately appears in your dashboard, but it does not start consuming time until you activate it. The expiration countdown begins only after activation. If your license is not activated, you will not be able to access the software.
Additional Installation: Automatic Restore Point Creation
When starting ControlSync for the first time, the system will automatically create a Restore Point. This precaution is necessary because during installation, device drivers are loaded and configured, and in rare cases, a change may affect the proper functioning of peripherals.
The restore point ensures that if any issue arises, you can revert the system to a previous state quickly and safely, without losing personal files. This guarantees that you always have a backup of your system's state before applying changes.
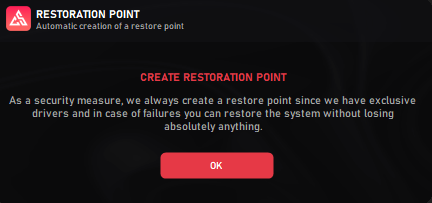
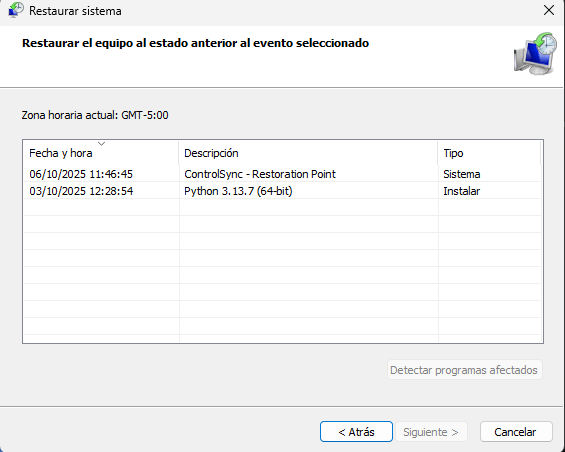
If the installation completes successfully, you can verify that the restore point has been created by accessing the Windows System Restore tool, where the restore point created by ControlSync will be listed.
2. System Preparation
Before downloading ControlSync, we need to adjust some settings on your PC to avoid installation errors.
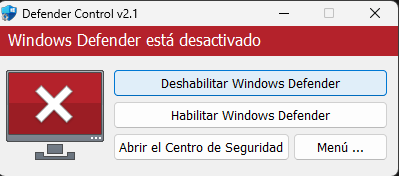
Our software includes an advanced internal protection system called Obfuscation, designed to safeguard its integrity. Because of this, some antivirus programs may incorrectly detect the installer as a virus. Please note: this is a false positive — the antivirus cannot properly analyze the files due to 100% obfuscation.
To ensure the installation runs smoothly, temporarily disable your antivirus. For convenience, you can use our utility DControl, which automatically disables the antivirus before installation.
Password File is: dcontrol
Once opened, simply click on Disable Antivirus and proceed with the installation.
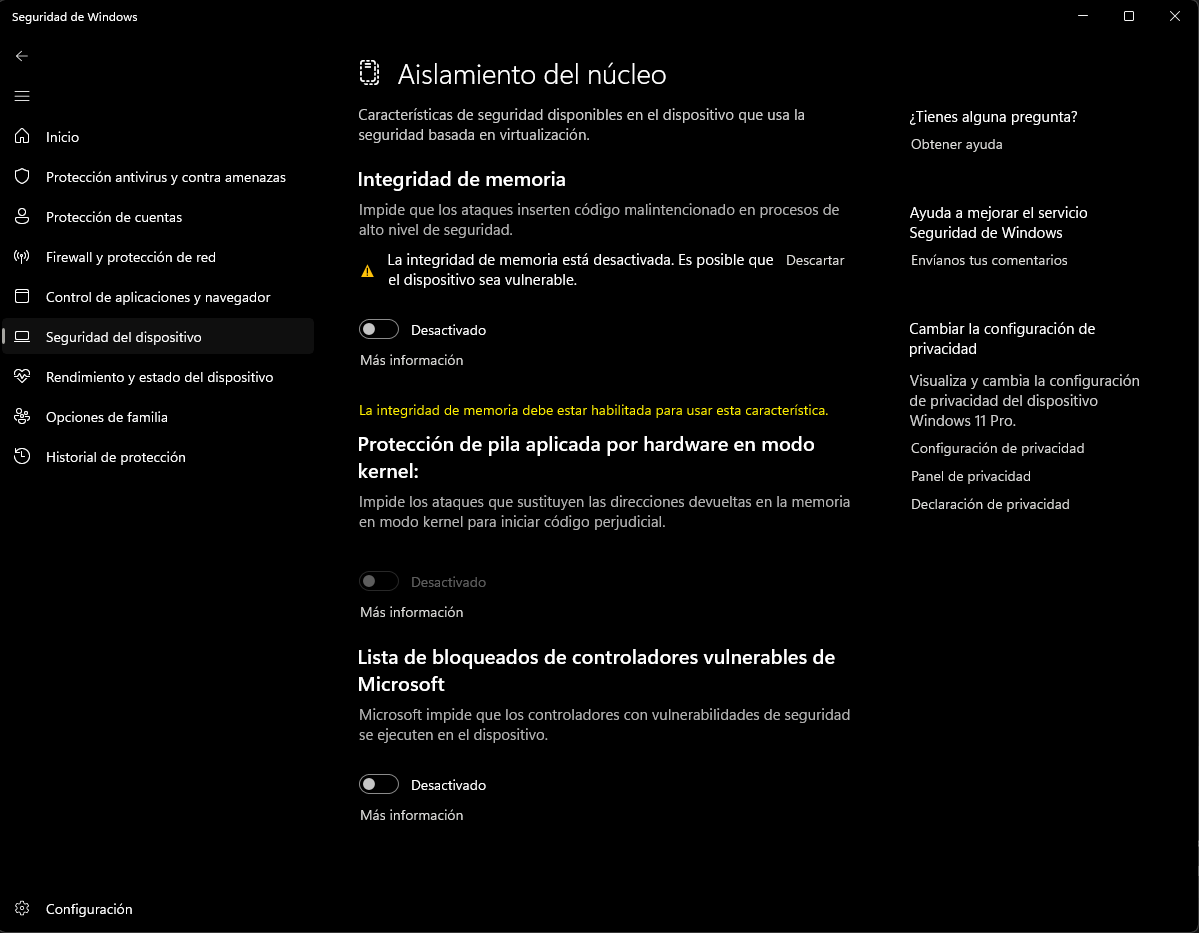
Additionally, while optional, we strongly recommend disabling the Windows 11 24H2 (Build 22631) driver vulnerability protection to prevent potential incompatibilities with our driver.
3. Software Download
After completing steps 1 and 2, proceed to download the ControlSync software.
The installer is designed to work automatically. ControlSync will detect whether all the required drivers are already installed on your system. If any are missing, the software will install them automatically without requiring additional steps from you.
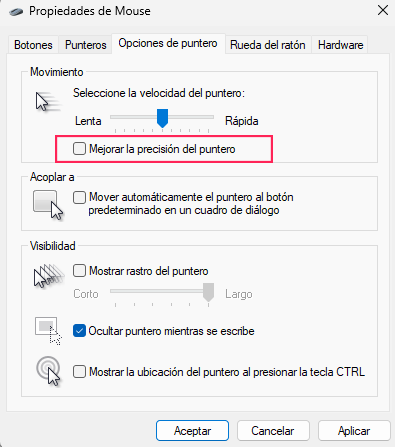
Optional but recommended: disable Mouse Acceleration (Enhance Pointer Precision) in your system's Mouse Properties. This ensures that ControlSync has full control over the raw movement of the mouse for maximum accuracy.
4. Completion and Restart
If this is the first time you run ControlSync, the software may not function correctly right away. A system restart is absolutely required in order to complete the driver installation successfully.
Warning: If you skip this restart, the software will not function at all.
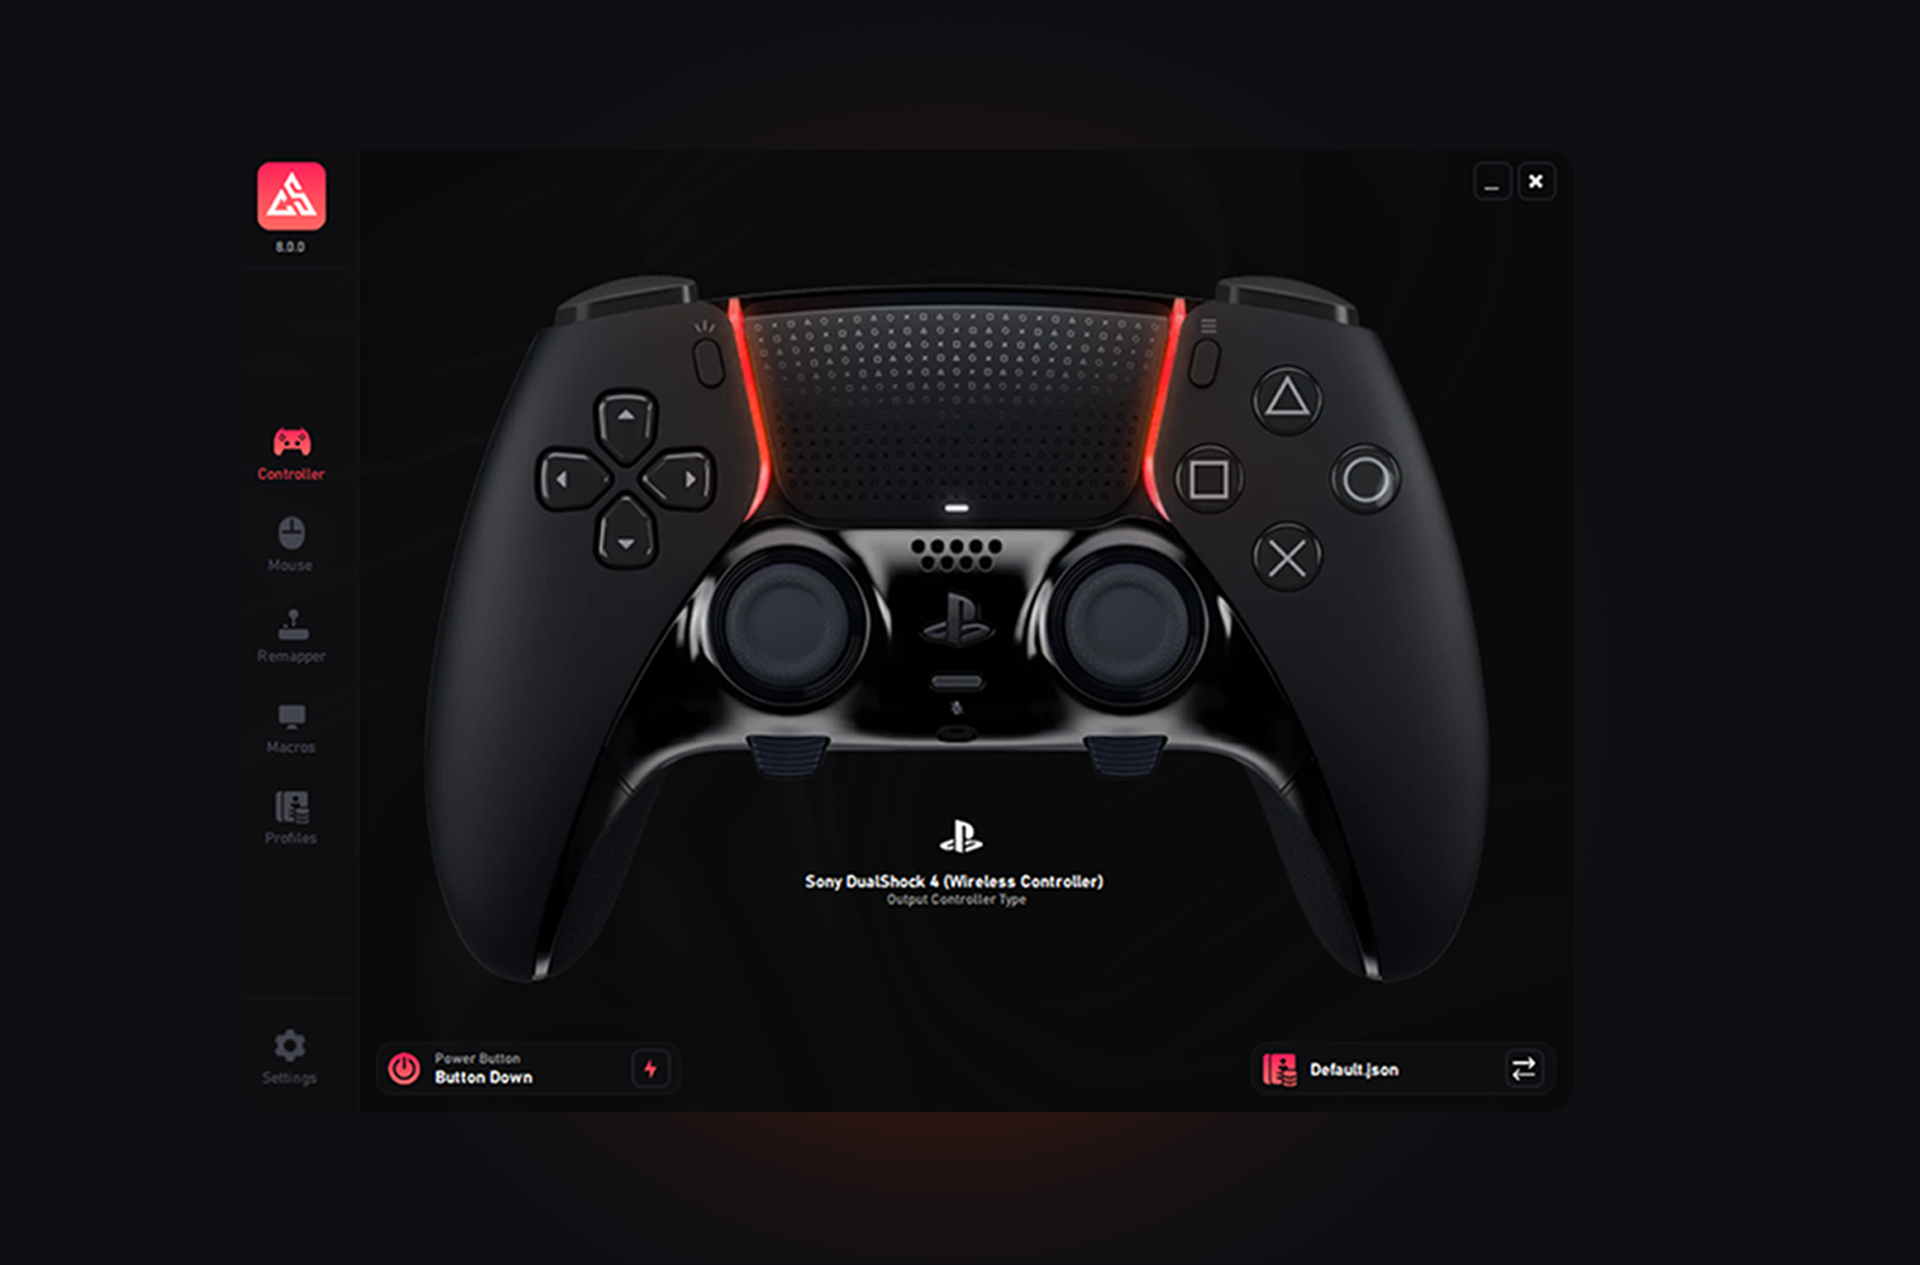
Controller
In this section, you'll find all the features included in the Controller Panel. Please read everything in your language so you don’t have to ask for support for something that’s already covered in this tutorial.
1. Map Buttons to Keyboard or Mouse
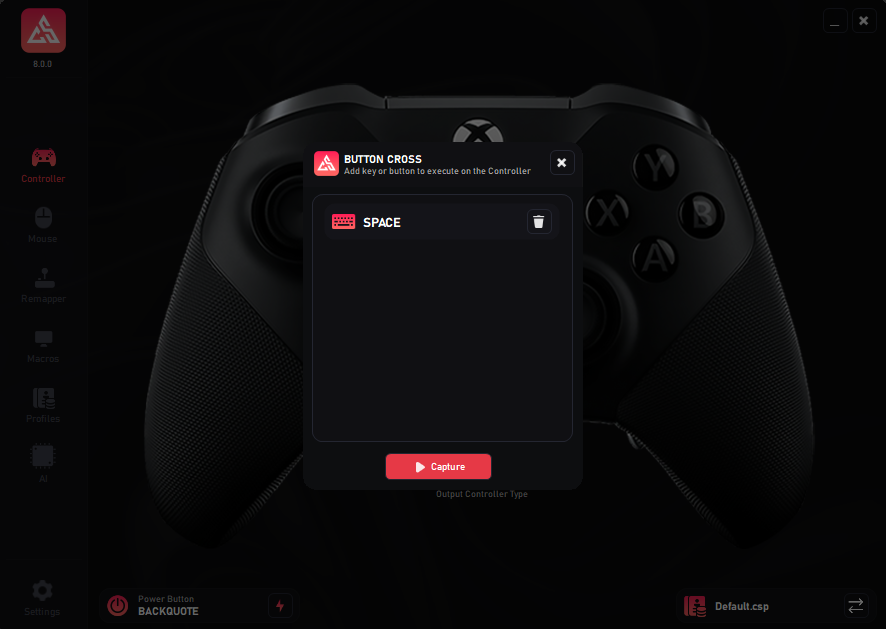
Each button of the Visual Controller can be clicked to assign a key from your keyboard or mouse. Once selected, the mapping is saved automatically.
When you click any button, a new window will appear. Inside it, click the Capture button and then press any keyboard or mouse key you want to assign. If you make a mistake, there is also a Delete button available to remove the assignment.
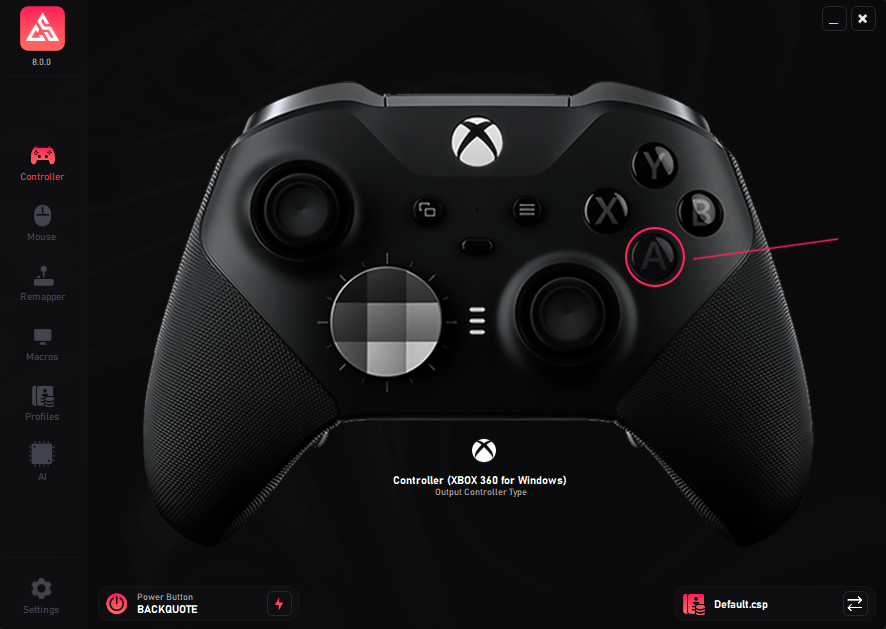
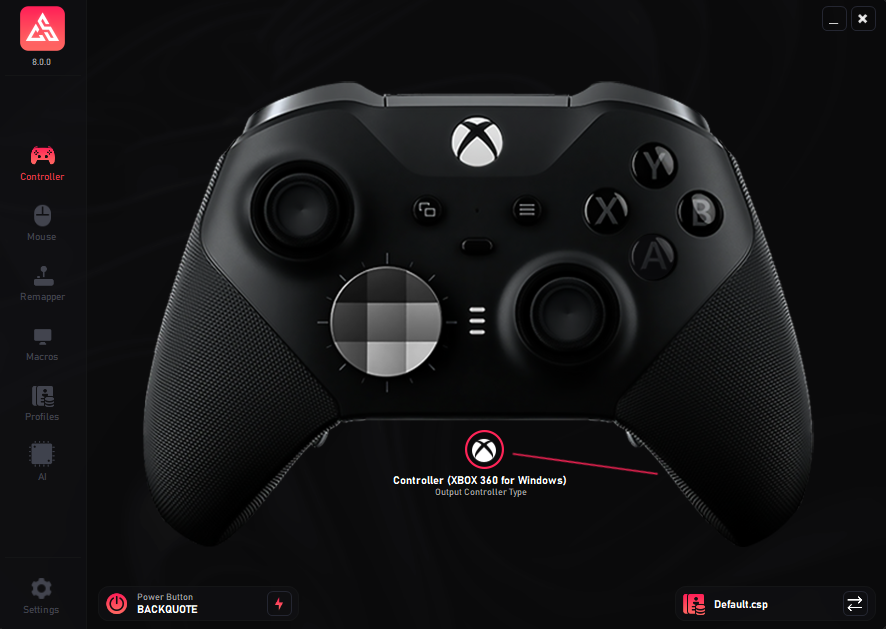
2. Change Virtual Controller Type
At the bottom of each Virtual Controller, you will see the controller’s logo. This logo works as a toggle button that lets you switch between DualShock 4 and Xbox 360 modes. You can change the controller type at any time without needing to switch profiles.
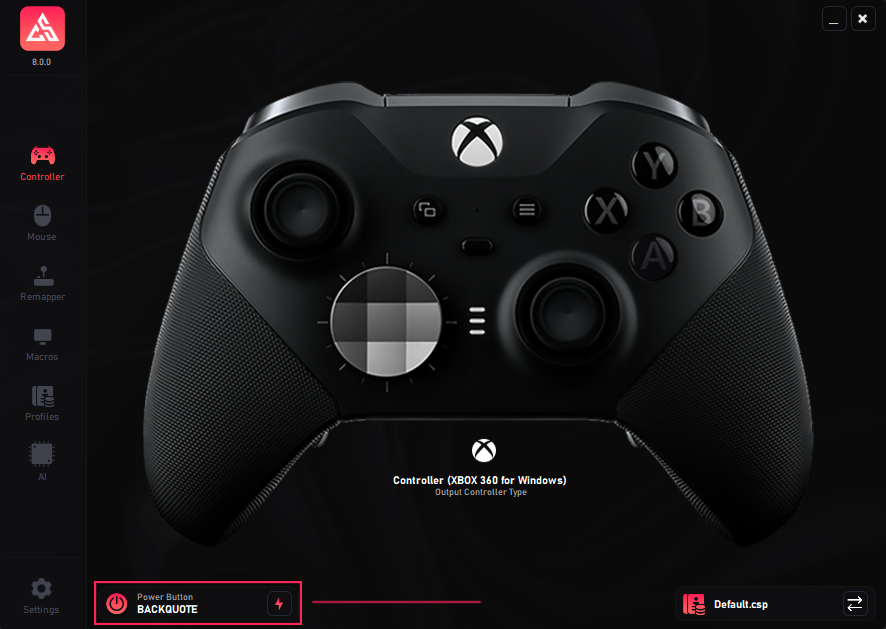
3. Power Button
At the bottom left of the Controller Panel, you will find the Power Button. This button allows you to turn the virtual controller ON or OFF at any time.
How does it work?
Click on the lightning icon ⚡ and assign a keyboard or mouse key that you do not normally use. This key will act as your toggle switch to enable or disable the virtual controller.
Important details:
- If no key is assigned, the virtual controller will not work.
- Once a key is assigned, pressing it will temporarily lock your physical mouse and keyboard.
- While locked, only the virtual controller remains active, so games will never detect that you are actually using a keyboard and mouse.
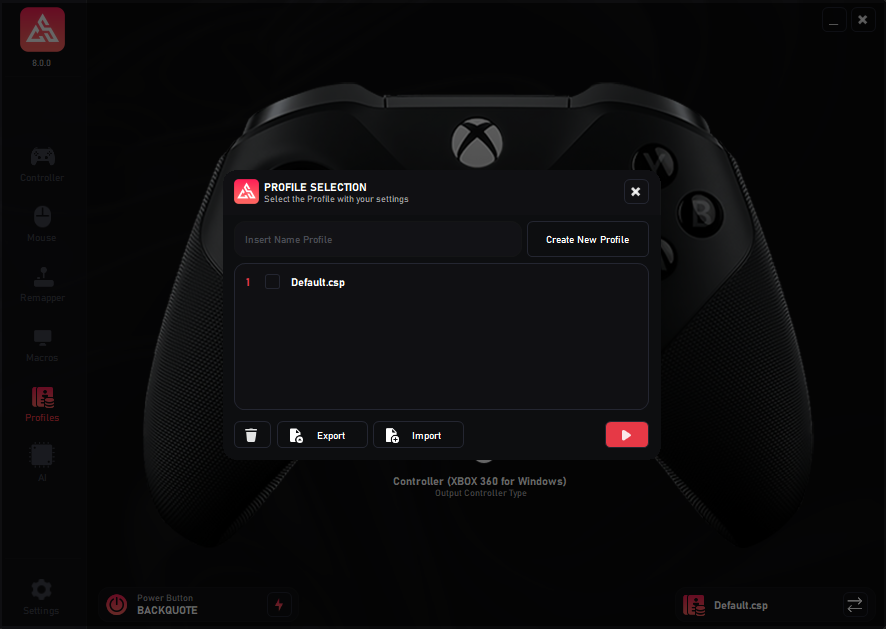
4. Profiles
The Profiles System has been redesigned to be much simpler and more user-friendly. You can quickly create and manage multiple profiles according to your needs.
Creating a new profile:
Enter a profile name and click the Create New Profile button. Your new profile will immediately appear in the list at the bottom of the panel.
Profile order and auto-load:
Profiles are numbered sequentially. The application will always automatically load Profile #1 on startup. You can easily change the order of profiles by dragging one above the other.
Additional options:
- Import profiles from an external file.
- Export any existing profile.
- Delete unwanted profiles.
- Select a profile and click Play to load it instantly.
AI-Powered Aim Assistance System
This section explains in detail how the Artificial Intelligence assistance system works, helping you achieve an optimal configuration before requesting support.
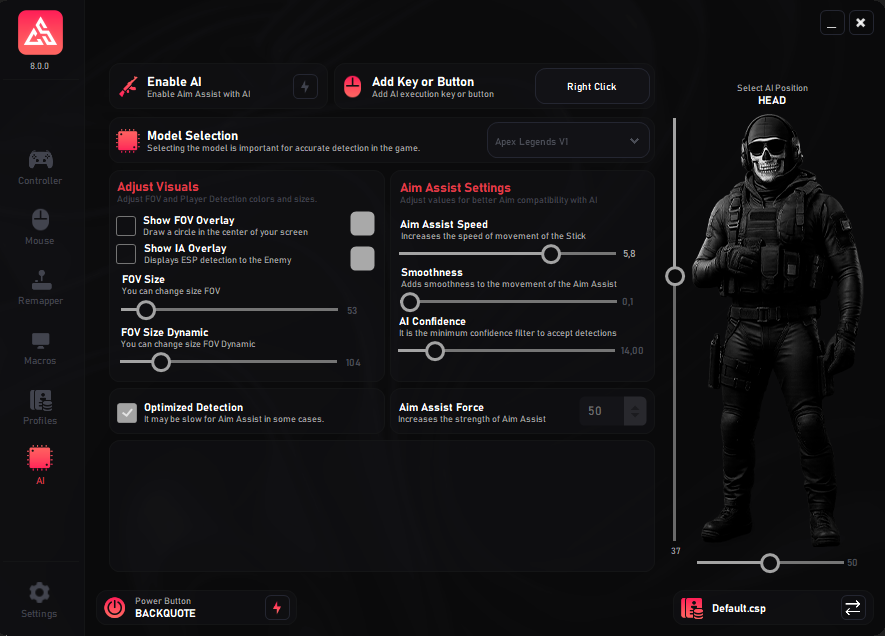
Important Note
Using the AI aiming assistance system does not guarantee 100% accuracy, as performance depends heavily on your hardware components. It is not mandatory to use the AI to enable ControlSync; you can disable it if preferred. This clarification helps avoid support requests on systems with limited hardware performance.
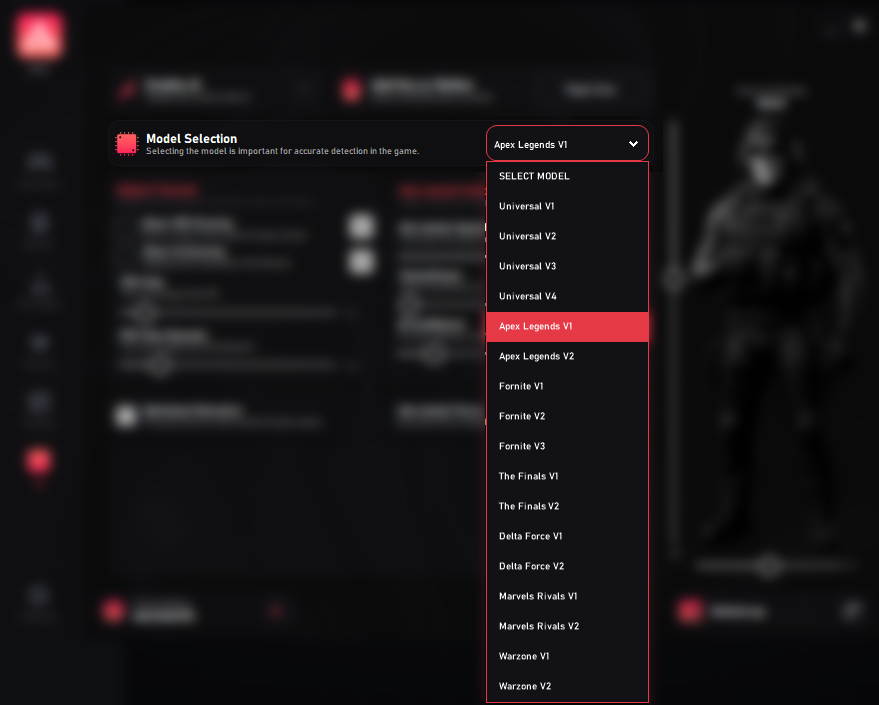
Model Selection
Before activating the system, select a detection model compatible with your game. Several versions are available (V1, V2, etc.), each optimized for different setups. Not all models provide the same level of accuracy, so we recommend testing several to find the one that best suits your needs.
Assign a Key or Button – Activate AI
Click the assignment button and press a keyboard key or mouse button. This will be your main command to toggle the AI Aim Assist on or off. Then, check the 'ENABLE AI' box; if not enabled, the remaining options will stay locked.

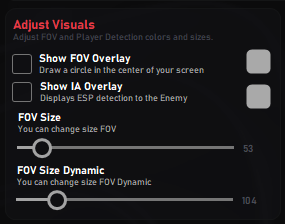
Visual Adjustment
This section allows you to configure the visual elements of the system, such as the detection area (FOV) and AI overlays. These settings determine how visual indicators are displayed on the screen.
Show FOV Overlay: Draws a circle at the center of the screen representing the AI’s detection range (Field of View). This is a purely visual element that does not affect performance. The gray box on the right allows you to change the FOV circle color for better visibility.
Show AI Overlay: Displays a rectangle over detected enemies, helping verify model accuracy. It also includes a color selector for customizing ESP markers. Even if this overlay is disabled, AI detection will continue to run in the background.
FOV Size: Controls the radius of the detection field. A smaller value provides greater precision, while a larger value expands the detection range but may reduce aiming stability.
Dynamic FOV: Enables dynamic FOV behavior. The detection area automatically adjusts based on target distance or player speed. It can also be manually toggled using the assigned key or button, making the FOV expand or shrink in real time.
Aim Assist Configuration (AI)
Here you can fine-tune the parameters that control how the AI-based aim assist behaves. These settings let you balance speed, smoothness, and precision to match your playstyle.
Aim Assist Speed: Controls how quickly the assistance system responds to crosshair movement. A higher value increases reaction speed but may lead to overcorrection.
Smoothness: Defines how fluid and natural the assisted aiming feels. A low value results in fast, direct movements, while a higher value makes transitions smoother and more organic.
AI Confidence Level: Determines the minimum confidence required by the AI to consider a detection valid. A higher value improves precision, while a lower one increases detection range but with a greater chance of false positives.

Optimization and Aim Assist Power
Allows you to adjust the system’s performance and aiming strength to balance stability, resource usage, and precision.
Optimized Detection: Activates an optimized detection mode designed for systems with mid- or low-range graphics cards. It reduces GPU load through more efficient algorithms, though CPU usage may slightly increase.
Aim Assist Force: Controls how strong the AI aim correction is. A higher value makes aiming assistance more aggressive, while a lower value produces smoother and more natural movement.

Aiming Position (AI Position)
Defines the exact body point where the AI will focus its aim assistance. The vertical and horizontal sliders allow precise control over the target point.
Vertical Control: Adjusts the height of the impact point. Move it up to aim at the head or chest, or down to target the abdomen or legs.
Horizontal Control: Adjusts the lateral aiming position. Moving it to the right shifts the aim to that side, while moving it left compensates in the opposite direction.
AI Position Indicator: Displays in real time the body part the AI is currently targeting (e.g., Head, Chest, Abdomen), making it easier to visually calibrate the system.

Mouse
In this section, you'll find all the features included in the Mouse Panel. Please read everything in your language so you don’t have to ask for support for something that’s already covered in this tutorial.
1. Mouse Settings
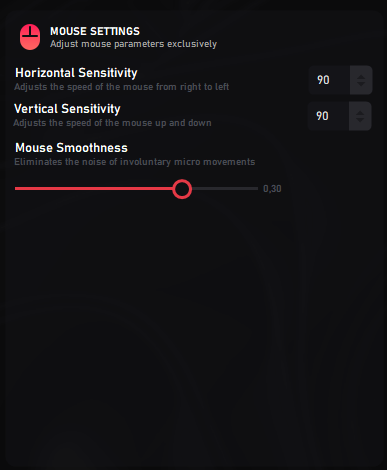
In the Mouse Settings section, you will find different sensitivity options to fully customize how your mouse interacts with the virtual controller.
Horizontal Sensitivity: Controls the speed of your character’s movement when moving the mouse left or right. Higher values make movements faster, while lower values make them slower.
Vertical Sensitivity: Controls the speed of your character’s movement when moving the mouse up or down. As with horizontal sensitivity, higher values increase speed and lower values reduce it.
Mouse Smoothness: Adjusts the fluidity of mouse movement. Increasing this value makes movements smoother, but keep in mind that too much smoothness can feel like added input delay — although it is not real lag, just the smoothing effect. For best results, we recommend starting with a medium setting (around 0.30) and adjusting to your preference.
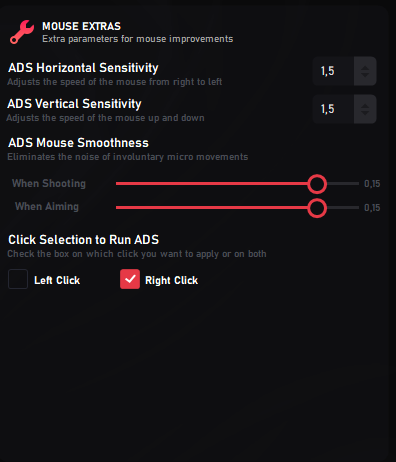
2. Mouse Extras (ADS Settings)
The Mouse Extras section provides additional parameters to improve mouse precision when using ADS (Aim Down Sights). These settings allow you to fine-tune how your aim responds when shooting or aiming with the virtual controller.
ADS Horizontal Sensitivity: Adjusts the speed of the mouse when moving horizontally (left ↔ right) while aiming down sights. Higher values = faster movement, lower values = slower, more controlled aim.
ADS Vertical Sensitivity: Adjusts the speed of the mouse when moving vertically (up ↕ down) while aiming down sights. As with horizontal, higher values = faster, lower = more precise.
ADS Mouse Smoothness: Reduces involuntary micro-movements when aiming. You can adjust separate values for:
- When Shooting: Stabilizes aim while firing.
- When Aiming: Helps keep crosshair steady when scoped or aiming down sights.
Click Selection to Run ADS: Choose which mouse button activates ADS (usually Right Click, but you can also set Left Click or both). This gives you flexibility to match your playstyle.
Remapper
In this section, you'll find all the features included in the Remapper Panel. Please read everything in your language so you don’t have to ask for support for something that’s already covered in this tutorial.
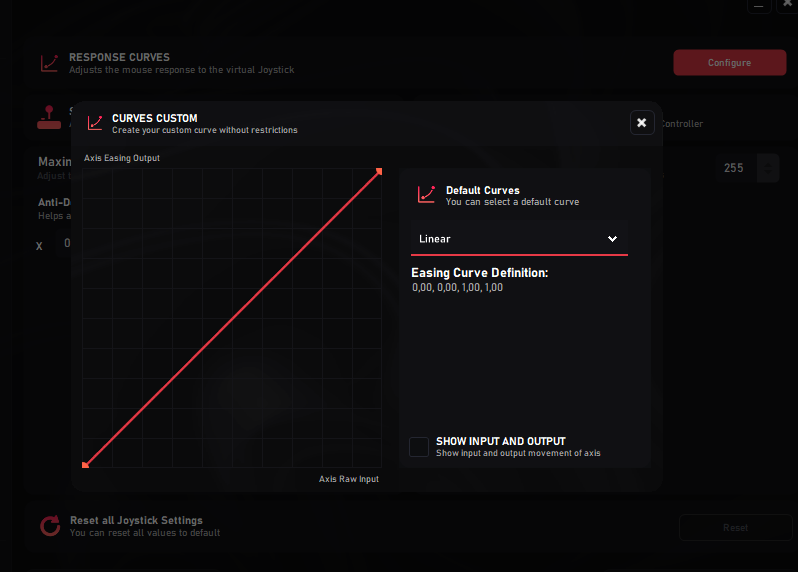
1. Response Curves
The Response Curves section allows you to adjust how the mouse input is translated into the virtual joystick’s movement. By modifying the curve, you can fine-tune the relationship between raw input (mouse movement) and axis output (controller response).
Default Curves: You can choose from predefined curves, such as Linear, which provides a 1:1 relationship between input and output. Other curves can make small movements more precise or amplify large movements for faster turning.
Custom Curves: If you prefer, you can create your own curve without restrictions. The graph shows the Axis Raw Input on the X-axis and the Axis Easing Output on the Y-axis. By shaping this curve, you decide exactly how sensitive or gradual the response will be at different points.
Show Input and Output: You can enable the Show Input and Output option to visualize how your raw mouse movements translate into joystick response in real time.
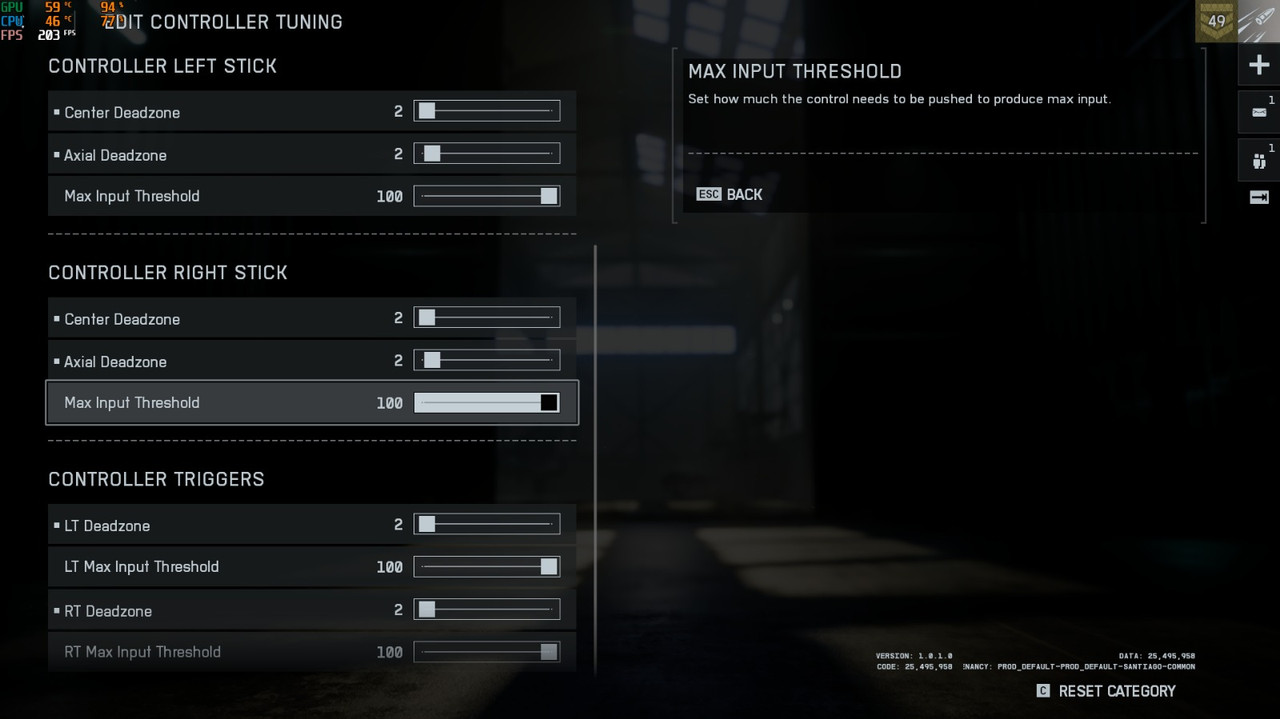
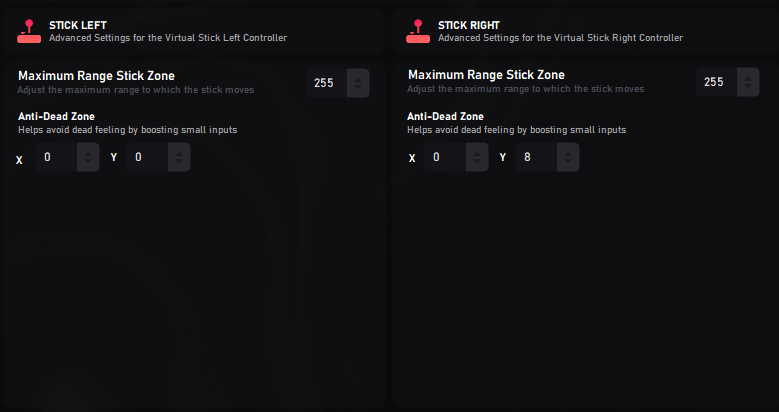
2. Dead Zones (Stick Settings)
The Dead Zone settings allow you to fine-tune how the virtual sticks (Left Stick and Right Stick) respond to small movements. This is especially important to remove drift, boost responsiveness, or even take advantage of aim assist in some games.
Maximum Range Stick Zone: Defines the maximum range of movement that each stick can reach. The default value (255) ensures the stick uses its full range, but you can adjust this if you want to limit movement.
Anti-Dead Zone: This setting forces the joystick to “leave” its default resting zone (X/Y) so that even the slightest touch is registered as movement. It is very useful because it eliminates the dead feeling and makes the stick more responsive.
Advanced use: - Increasing the Anti-Dead Zone can simulate micro-movements of the joystick, which in many games increases aim assist by constantly giving small inputs. - However, if the value is set too high, it can cause unwanted drift or feel uncomfortable, since the game will always think the stick is slightly moving even when you’re not touching it.
Example: - Stick Left with X=0 / Y=0 for precise walking. - Stick Right with X=0 / Y=8 to enhance aim assist when aiming.
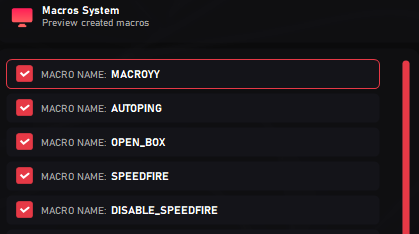
Macros
In this section, you'll find all the features included in the Macros Panel. Please read everything carefully in your language so you don’t have to ask for support for something that’s already covered in this tutorial.
0. How to Edit an Existing Macro
Editing an existing macro in ControlSync is very simple. Just move your mouse over the macro you want to modify and double-click it. This will open the macro in the editor panel where you can change, add, or remove actions as needed.
1. Creating Macros
You can create your own macros directly inside ControlSync. Simply choose “Create Macro” and start building actions step by step.
2. Import Macros
ControlSync allows you to import macros that were shared or created previously. Select the macro file and load it into your profile.
3. Export Macros
You can also export your macros to share with other users or to keep them as a backup. This is useful if you want to replicate your exact setup across different PCs.
4. Delete All Macros
If you want to start fresh, you can delete all macros from your profile with a single click.
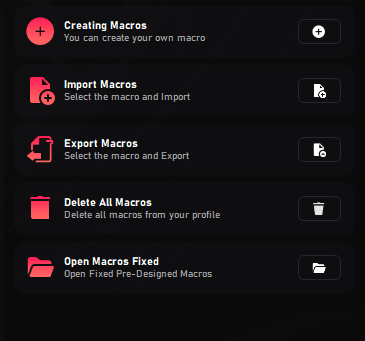
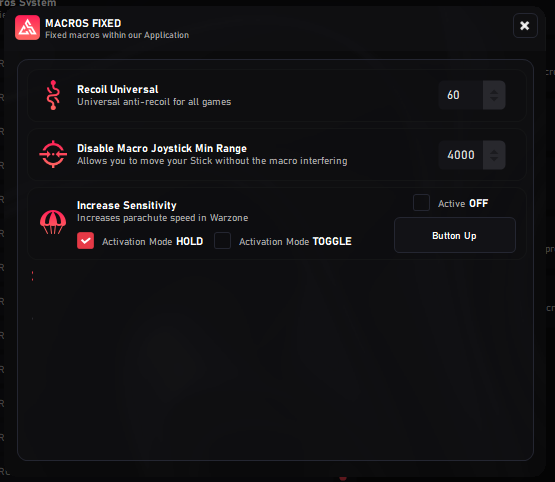
5. Fixed Macros
The Fixed Macros section includes pre-configured macros integrated into ControlSync. These are optimized for popular scenarios and do not require complex setup.
- Recoil Universal: Applies universal anti-recoil for all games. Adjust the intensity value (default 60) depending on how much compensation you want.
- Disable Macro Joystick Min Range: Defines the minimum range where macros will not interfere with stick movements. This allows you to move your joystick freely without the macro affecting small inputs. Default value: 4000.
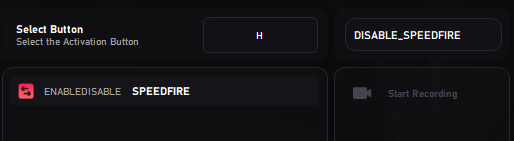
- Increase Sensitivity (Warzone): Special macro designed for Call of Duty: Warzone, it increases parachute descent speed. - Can be toggled Active ON/OFF. - Supports Activation Modes: HOLD: The macro is active only while the button is held down. TOGGLE: Press once to activate, press again to deactivate. - You can also assign the activation button with the Button Up selector.
Profiles Functions
In this section, you'll find all the features included in the Profile Panel. Please read everything in your language so you don’t have to ask for support for something that’s already covered in this tutorial.
1. Profiles
The Profiles System has been redesigned to be much simpler and more user-friendly. You can quickly create and manage multiple profiles according to your needs.
Creating a new profile:
Enter a profile name and click the Create New Profile button. Your new profile will immediately appear in the list at the bottom of the panel.
Profile order and auto-load:
Profiles are numbered sequentially. The application will always automatically load Profile #1 on startup. You can easily change the order of profiles by dragging one above the other.
Additional options:
- Import profiles from an external file.
- Export any existing profile.
- Delete unwanted profiles.
- Select a profile and click Play to load it instantly.

Settings
In this section, you'll find all the features included in the Settings Panel. Please read everything in your language so you don’t have to ask for support for something that’s already covered in this tutorial.
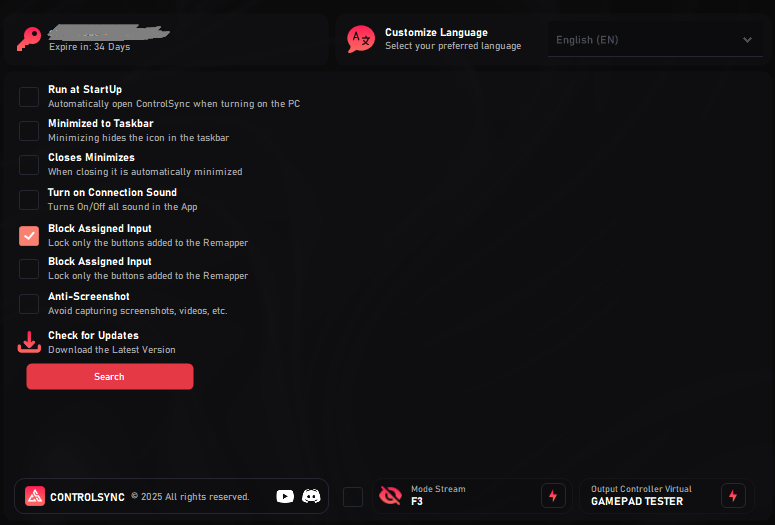
1. General Settings
The General Settings panel provides global options to customize how ControlSync behaves on your system. Here you can configure startup behavior, minimize options, input blocking, and more.
- Run at Startup: Automatically launches ControlSync when you turn on your PC.
- Minimized to Taskbar: Keeps ControlSync running but minimized to the taskbar when launched.
- Closes Minimizes: When enabled, closing the app will only minimize it instead of exiting.
- Turn on Connection Sound: Enables or disables sound notifications when connecting.
- Block Assigned Input: Prevents the assigned keys in the Remapper from sending signals to your system. This is useful to avoid double inputs (keyboard + virtual controller).
- Anti-Screenshot: Blocks third-party tools from capturing screenshots, video, or streaming your app. Recommended for privacy and security.
- Check for Updates: Use the Search button to download the latest available version of ControlSync.
How to create Macros
In this section, you'll find all the features included in the How to create Macros Panel. Please read everything carefully in your language so you don’t have to ask for support for something that’s already covered in this tutorial.
1. Activation Key and Macro Name
Click the Add Key / Button option and then press the keyboard key or mouse button you want to use to execute the macro.
After that, assign a unique name to your macro. This prevents confusion and makes it easier to organize them.

2. Functions for Creating Macros
The Macros Panel provides multiple tools to record and add functionality to your macros. Each option has a specific purpose, and using them correctly will help you build powerful automation.
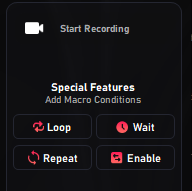
▶ Start Recording
This button captures the inputs you send through the Remapper:
- Click Record.
- Activate the Remapper with your Power Button.
- Press the key you want to add.
The software will automatically detect the controller button linked to your key.
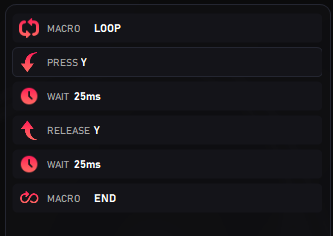
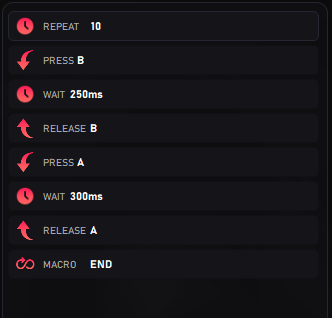
🔁 Loop
Creates a continuous loop in your macro:
- Place LOOP at the beginning.
- Place END at the end.
Without END, the macro will not stop correctly.
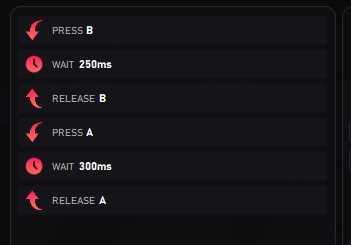
⏱️ Wait
Adds a delay between actions. Example:
Press A → Wait 100 ms → Release
This makes the macro pause 100 milliseconds before moving to the next action.
🔂 Repeat
Repeats a function several times automatically:
- Must be placed at the top of the macro.
- Not compatible with
.
✅ Enable
Used to stop a specific macro running in a permanent loop.
Enable: MacroName
This command will disable the targeted macro immediately.
3. Adding Macros to Joystick
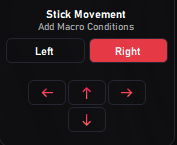
ControlSync allows you to assign macros directly to the virtual joystick. This is useful for simulating stick movements automatically.
🎮 Left & Right Joystick
You can choose whether the macro will be applied to the Left Stick or the Right Stick.
⬆⬇⬅➡ Directional Movements
There are four arrow buttons that represent each direction of the joystick:
- Up
- Down
- Left
- Right
By default, each movement uses the maximum stick range (255).
⚙️ Editing Range
You can adjust the movement intensity by setting a value between 0 and 255. This value determines how far the joystick will move.
⚠️ In Case of Error
Below is an explanation of a common driver-related error and how to fix it.
1. Driver Related Error 0x001
This error is common when the software was unable to install the drivers automatically. It can happen for several reasons, such as not following the installation steps correctly or failing to disable your Antivirus, which blocks the installation.
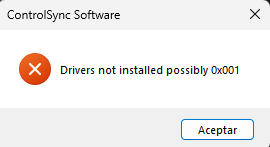
🛠️ Solution for this Error 0x001
- Make sure you followed all installation steps.
- Ensure your Antivirus was disabled before installing ControlSync.
- Restart your system and run the installation again.
After making sure everything is completely disabled, please run the installer again and click the Install button. This will only reinstall the necessary components.
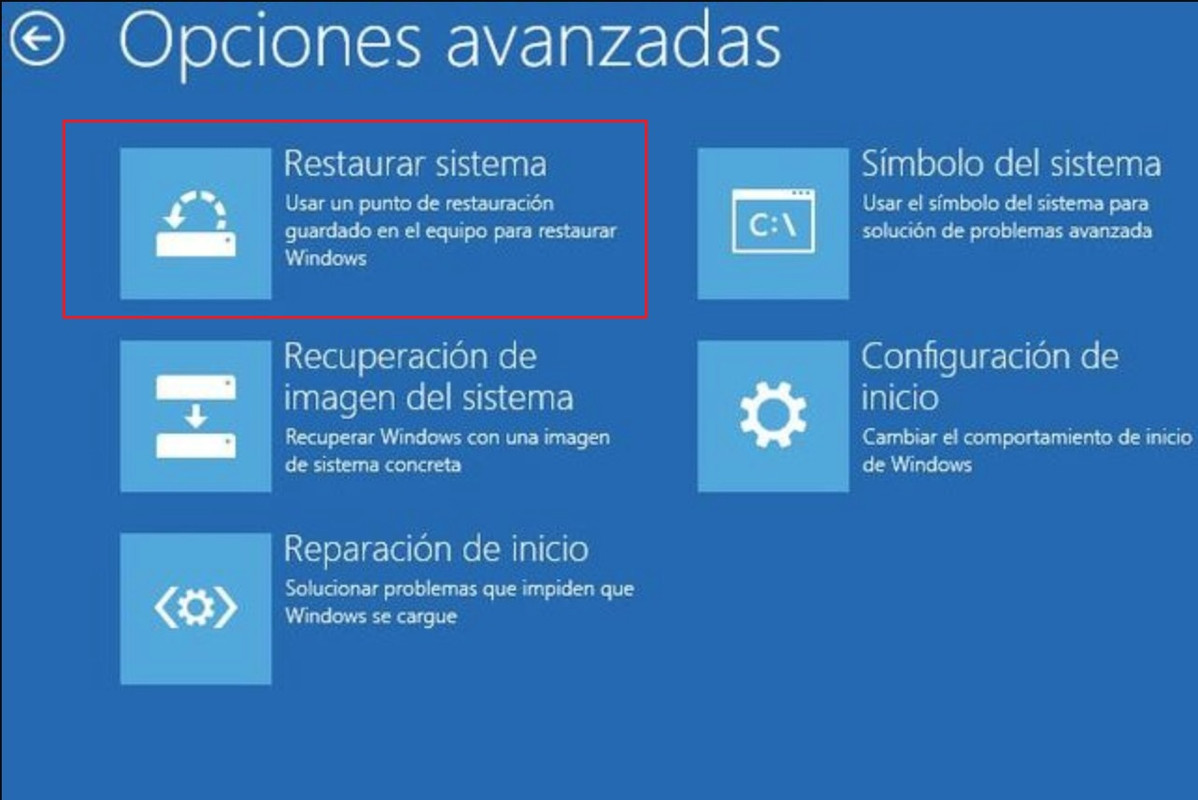
2. Mouse and Keyboard TOTALLY Blocked
This issue occurs when the antivirus was not properly disabled before installation. The security system mistakenly detects our driver as a threat and removes it, leaving the driver unusable. As a result, the main peripherals (mouse and keyboard) stop working completely.
🛠 Solution to the Blocking Problem
Don't worry: ControlSync automatically creates a Restore Point at the start of installation.
To recover the system:
🔹 Restart your PC by forcing a shutdown three times in a row (before Windows loads).
🔹 This will trigger the Windows Recovery Environment.
🔹 From there, select System Restore and choose the restore point created by ControlSync.
After completing the process, your system will return to its previous state and the peripherals will work again.
🕹️ Game Configuration
Select a game below to view recommended ControlSync settings and examples.


Download
This is a Base profile, you must adjust sensitivities and in case the game requires it, adjust buttons in the profile.